Here’s how you can find out…
You know it, I know it – we’re all snapping away with our at-the-ready smartphones and fancy pants cameras. But, when it comes to printing those priceless moments, we’ve found a Customer or two (a lot really) finding themselves in a pixelated pickle. It’s a question we get asked every day – How big can I print my image without sacrificing quality? So! Let’s talk about the world of pixel dimensions, image sizes, and finding the perfect print balance.
Understanding Image Resolution:
Image resolution refers to the number of pixels contained within an image. It plays a vital role in determining the quality and clarity of a print. The higher the resolution, the sharper the image, and the happier our eyes will be.
When it comes to printing, a general rule of thumb is to maintain a resolution of at least 300 pixels per inch (PPI) for high-quality prints. However, this does not necessarily mean you must stick to this guideline for all print sizes. The viewing distance also plays a crucial role in determining the acceptable resolution for a particular print. But we’ll get to that in a sec.
Checking Pixel Dimensions:
To ensure your photo file size is adequate for printing, you can follow these simple steps:
- Open the folder where your photo is saved.
- Right-click on the photo and select “Properties” from the drop-down menu.
- In the Properties window, choose the “Details” tab.
- Look for the “Image” section and find the “Dimensions” or “Resolution” field.
- Check the dimensions of the photo. For example, if the photo is 3000 x 2000 pixels, it means the photo is 3000 pixels wide and 2000 pixels tall.
Determining Suitable Print Sizes:
To determine the minimum pixel dimensions required for a specific print size, you can use the following formula:
Print width (in inches) x PPI = Required pixel width, Print height (in inches) x PPI = Required pixel height
For instance, if you want to print an 8 x 10 inch photo at 300 PPI, the image should be at least 2400 x 3000 pixels (8 inches x 300 PPI = 2400 pixels wide, 10 inches x 300 PPI = 3000 pixels tall).
Viewing Distance and Image Quality:
The distance from which a print is viewed affects the perceived image quality. When viewing a print from a larger distance, the human eye tends to blend the pixels, resulting in a smoother image. This allows for lower-resolution images to be printed at larger sizes without a noticeable loss in quality. If you ever walk right up close to a photo on a billboard, you’ll see what I mean. So, if you plan to display a large 30 x 40-inch print on a wall, viewers will generally stand several feet away to appreciate the entire image. In that case, lower-resolution images can be printed at larger sizes while still getting a decent result. However, for prints that will be viewed up close, such as in photo albums or small frames on a desk, higher-resolution images are essential to maintain clarity and detail.
For the larger sizes we print up to at Streets Imaging, we don’t recommend printing images lower than 150 PPI as the pixelation becomes far too noticeable.
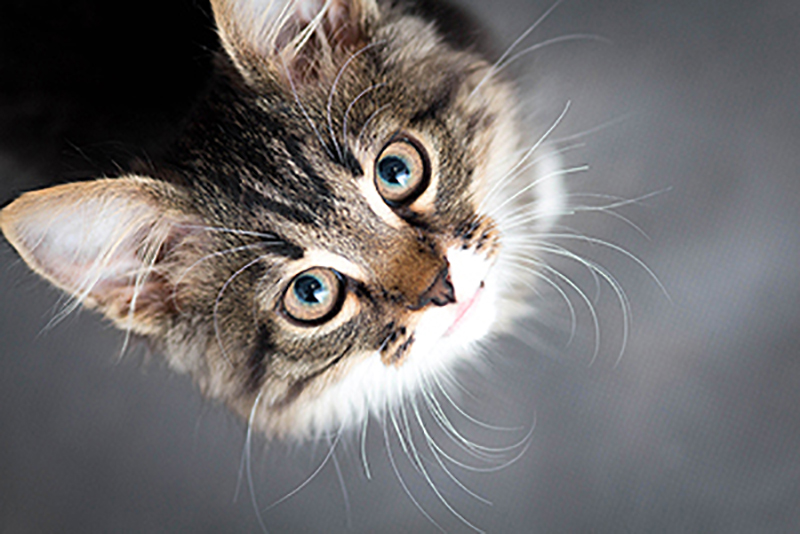
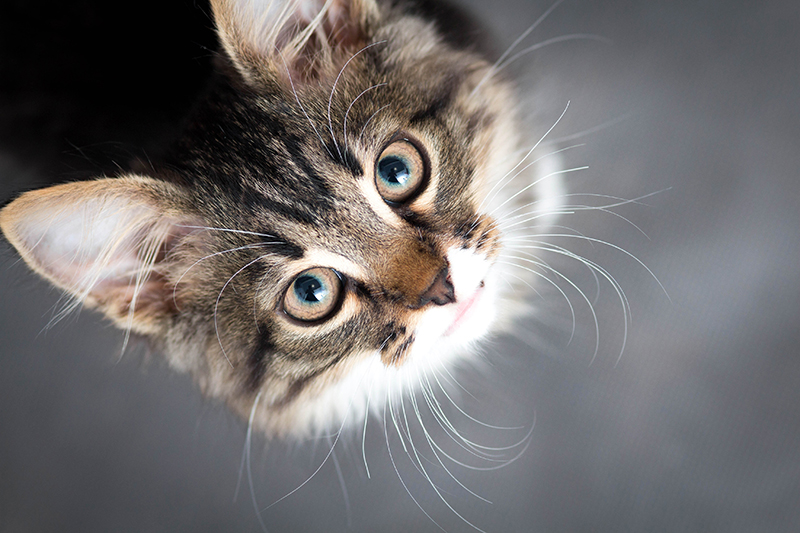
See the example below – the first image below has half the pixels of the one after it which is why it looks like it has less definition. But as you move away from the two images the difference in image quality becomes much less obvious. This is a good example of the kind of difference you’ll see in quality when printing at half of the recommended resolution.
If you are still finding that your image just simply isn’t going to print big enough for that space above the couch you were hoping to fill, how about creating a gallery of smaller images to fill that space? Or get creative with framing coupled with nice wide matting – it takes up more wall area without printing your image larger than the pixel dimensions will allow it and you’ll end up with some beautiful, creative results.
Unfortunately, it’s not just a matter of resaving your low-resolution image with a higher pixel ratio. You can’t create information that isn’t there in the first place. You’ll need to go back to a higher-resolution file or original raw file. But who knows – AI might have the answers to this soon if it doesn’t already. It’s important to remember though that Streets Imaging’s processing is for the most part, automated. We will not check your image resolution before we print. It is the Customers responsibility to check the resolution suitability of your files prior to printing. If we do spot something noticeably off about your image, we’ll do our best to get in touch before we send it. Remember, you can always flag orders your unsure of by selecting “Colour Correction” and entering some notes for us to review. There is a cost to this but you will have peace of mind if you need it.
| Pixel Dimensions | Full-Resolution Print | Largest Print |
| at 300 PPI | at 150 PPI | |
| 400×600 | 1.5 in x 2 in | 2.5 in x 4 in |
| 1000×1500 | 3.5 in x 5 in | 6.5 in x 10 in |
| 1200×1800 | 4 in x 6 in | 8 in x 12 in |
| 2000×3000 | 6.5 in x 10 in | 13.5 in x 20 in |
| 3000×4500 | 10 in x 15 in | 20 in x 30 in |
| 4000×6000 | 13.5 in x 20 in | 26.5 in x 40 in |
| 4800×7200 | 16 in x 24 in | 32 in x 48 in |
| 6000×9000 | 20 in x 30 in | 40 in x 60 in |
| 12000×18000 | 40 in x 60 in | 80 in x 120 in |
Understanding the relationship between resolution, viewing distance, and print size is pretty crucial for achieving high-quality prints. By checking the pixel dimensions and contemplating the possible viewing distance, you can determine how large you can print your photos without compromising your image quality. Remember, lower-resolution images can be suitable for larger prints when viewed from a greater distance, while higher resolution is essential for up-close viewing.
So, who’s ready to order some prints?
Here’s how you can find out…
You know it, I know it – we’re all snapping away with our at-the-ready smartphones and fancy pants cameras. But, when it comes to printing those priceless moments, we’ve found a Customer or two (a lot really) finding themselves in a pixelated pickle. It’s a question we get asked every day – How big can I print my image without sacrificing quality? So! Let’s talk about the world of pixel dimensions, image sizes, and finding the perfect print balance.
Understanding Image Resolution:
Image resolution refers to the number of pixels contained within an image. It plays a vital role in determining the quality and clarity of a print. The higher the resolution, the sharper the image, and the happier our eyes will be.
When it comes to printing, a general rule of thumb is to maintain a resolution of at least 300 pixels per inch (PPI) for high-quality prints. However, this does not necessarily mean you must stick to this guideline for all print sizes. The viewing distance also plays a crucial role in determining the acceptable resolution for a particular print. But we’ll get to that in a sec.
Checking Pixel Dimensions:
To ensure your photo file size is adequate for printing, you can follow these simple steps:
- Open the folder where your photo is saved.
- Right-click on the photo and select “Properties” from the drop-down menu.
- In the Properties window, choose the “Details” tab.
- Look for the “Image” section and find the “Dimensions” or “Resolution” field.
- Check the dimensions of the photo. For example, if the photo is 3000 x 2000 pixels, it means the photo is 3000 pixels wide and 2000 pixels tall.
Determining Suitable Print Sizes:
To determine the minimum pixel dimensions required for a specific print size, you can use the following formula:
Print width (in inches) x PPI = Required pixel width, Print height (in inches) x PPI = Required pixel height
For instance, if you want to print an 8 x 10 inch photo at 300 PPI, the image should be at least 2400 x 3000 pixels (8 inches x 300 PPI = 2400 pixels wide, 10 inches x 300 PPI = 3000 pixels tall).
Viewing Distance and Image Quality:
The distance from which a print is viewed affects the perceived image quality. When viewing a print from a larger distance, the human eye tends to blend the pixels, resulting in a smoother image. This allows for lower-resolution images to be printed at larger sizes without a noticeable loss in quality. If you ever walk right up close to a photo on a billboard, you’ll see what I mean. So, if you plan to display a large 30 x 40-inch print on a wall, viewers will generally stand several feet away to appreciate the entire image. In that case, lower-resolution images can be printed at larger sizes while still getting a decent result. However, for prints that will be viewed up close, such as in photo albums or small frames on a desk, higher-resolution images are essential to maintain clarity and detail.
For the larger sizes we print up to at Streets Imaging, we don’t recommend printing images lower than 150 PPI as the pixelation becomes far too noticeable.
See the example below – the first image below has half the pixels of the one after it which is why it looks like it has less definition. But as you move away from the two images the difference in image quality becomes much less obvious. This is a good example of the kind of difference you’ll see in quality when printing at half of the recommended resolution.


If you are still finding that your image just simply isn’t going to print big enough for that space above the couch you were hoping to fill, how about creating a gallery of smaller images to fill that space? Or get creative with framing coupled with nice wide matting – it takes up more wall area without printing your image larger than the pixel dimensions will allow it and you’ll end up with some beautiful, creative results.
Unfortunately, it’s not just a matter of resaving your low-resolution image with a higher pixel ratio. You can’t create information that isn’t there in the first place. You’ll need to go back to a higher-resolution file or original raw file. But who knows – AI might have the answers to this soon if it doesn’t already. It’s important to remember though that Streets Imaging’s processing is for the most part, automated. We will not check your image resolution before we print. It is the Customers responsibility to check the resolution suitability of your files prior to printing. If we do spot something noticeably off about your image, we’ll do our best to get in touch before we send it. Remember, you can always flag orders your unsure of by selecting “Colour Correction” and entering some notes for us to review. There is a cost to this but you will have peace of mind if you need it.
| Pixel Dimensions | Full-Resolution Print | Largest Print |
| at 300 PPI | at 150 PPI | |
| 400×600 | 1.5 in x 2 in | 2.5 in x 4 in |
| 1000×1500 | 3.5 in x 5 in | 6.5 in x 10 in |
| 1200×1800 | 4 in x 6 in | 8 in x 12 in |
| 2000×3000 | 6.5 in x 10 in | 13.5 in x 20 in |
| 3000×4500 | 10 in x 15 in | 20 in x 30 in |
| 4000×6000 | 13.5 in x 20 in | 26.5 in x 40 in |
| 4800×7200 | 16 in x 24 in | 32 in x 48 in |
| 6000×9000 | 20 in x 30 in | 40 in x 60 in |
| 12000×18000 | 40 in x 60 in | 80 in x 120 in |
Understanding the relationship between resolution, viewing distance, and print size is pretty crucial for achieving high-quality prints. By checking the pixel dimensions and contemplating the possible viewing distance, you can determine how large you can print your photos without compromising your image quality. Remember, lower-resolution images can be suitable for larger prints when viewed from a greater distance, while higher resolution is essential for up-close viewing.
So, who’s ready to order some prints?

